
Roller Shades Installation Guide
Installation Instructions For Roller Shades Using RollEase™ Brand Clutch Systems
Click here for Hunter Douglas Roller Shade Intruction (.pdf file)
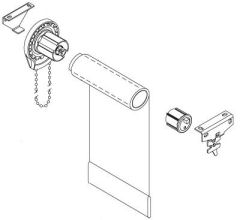 The universal brackets can be mounted left or right, inside, outside or ceiling
Brackets must be mounted perfectly level for shade to operate properly.
The universal brackets can be mounted left or right, inside, outside or ceiling
Brackets must be mounted perfectly level for shade to operate properly.
Properly locate and attach clutch and bracket to window frame. Attach roller end bracket to window frame using shade to determine proper location. Mount shade onto clutch end bracket and lower opposite end into notch in roller end bracket. Note: View shown is for right hand operation, regular toll. Simply switch brackets and rotate shade for left hand operation, reverse roll.
Aluminum Fascia System includes closed end brackets and fascia panel.
Mount brackets. Note: If you have an inside mount and must use "Inside mount holes", you must drill your own holes in the side of the bracket. Use at least two screws per bracket. BE SURE SCREW HEADS ARE CLEAR OF CLUTCH. Mount shade. MAKE SURE SHADE IS LEVEL. Install fascia panel by hooking top rib over brackets and snapping bottom rib into place over brackets tangs. BE SURE PANEL IS SNAPPED ON SECURELY.
Rear bead is against clutch housing when fabric is completely rolled up. Front stop bead will be located down on the chain at the proper location to limit fabric travel.
 On all Phifer shades with or without fascia, stop balls are installed on control chain to limit the travel of the fabric. The stop ball to the back side of the clutch should be installed with the fabric rolled completely up on the roller as in the picture above. The other stop ball is located on the chain to stop the fabric travel just below the length of the opening.
Fabricator Instructions-How to Attach the RollEase Tension Device to Control Cords
In order to be in compliance with the voluntary standard (American National Standard for Safety of Corded Window Covering Products) developed by WCMA and approved by the American National Standards Institute (ANSI), manufacturers, fabricators and workrooms are required to deliver finished window covering systems with the following:
Warning Tag attached to the RollEase control cord and plastic or metal bead chain. Tension Device attached to the control cord and plastic or metal bead chain with a Tension Device Warning Tag attached to the Tension Device.
The RollEase Tension Device complies with the ANSI standard.
Warning Tags on Control Cord and Bead Chain
All RollEase control cords are shipped with a Warning Tag attached. The Warning Tag will not interfere with installing the control cord into the clutch or with the operation of the clutch. If using metal or plastic bead chain, attach the Warning Tag to the bead chain before you close the chain.
Tension Device Attachment Instructions
There is a right and a wrong way to attach the Tension Device to the control cord or bead chain. The direction of the flat surface (back side) of the Tension Device must match the back surface of any RollEase clutch. Once the Tension Device is attached it cannot be removed.
Position the Tension Device making sure the cord is not twisted, then snap the Tension Device closed. Be sure the Tension Device is securely snapped together.
WARNING
Young children can strangle in the loop of pulled cords, chain and bead cords, and cords that run through window coverings. They can also wrap cords around their necks. To avoid strangulation and entanglement, keep cords out of reach of young children. Also,
1. Install safety devices that remove the cord loop or reduce access to cords, and
2. Move cribs and furniture away from window covering cords. Soft Shade Back side of Clutch Back of Tension Device
Roller Shade/System III Back side of Clutch Back side of Tension Device
1" Horizontal 2" Horizontal & Pleated/Cellular Back side of Clutch Back side of Tension Device
Shown right hand control, flat "back" side of Tension Device faces right.
Installer/Consumer Instructions - How to Install the RollEase Tension Device Tension Device Installation Instructions for Installers and Consumers
The Tension Device reduces the hazards of strangulation and entanglement of young children by limiting access to the control cord. Anchor the Tension Device, that is attached to the shade's control cord or bead chain, to the window frame or wall, so that young children cannot pull the cord around their necks.
Lower the shade or blind. Hold the Tension Device upright so the Warning Tag hangs straight down. Position the Tension Device on the window frame or the wall so that the Tension Device and control cord do not interfere with raising or lowering the shade. Tension Device should be installed without stretching or pulling down on the control cord. Stretching the cord will cause excessive wear. Do not twist or cross the control cord. Holding the Tension Device upright, and in position, as show, insert and secure the screw through the hold.
Note: The mounting screw must be secured into a solid surface or molly.
Click here for Hunter Douglas Roller Shade Intruction (.pdf file)
The universal brackets can be mounted left or right, inside, outside or ceiling
Brackets must be mounted perfectly level for shade to operate properly. Properly locate and attach clutch and bracket to window frame. Attach roller end bracket to window frame using shade to determine proper location. Mount shade onto clutch end bracket and lower opposite end into notch in roller end bracket. Note: View shown is for right hand operation, regular toll. Simply switch brackets and rotate shade for left hand operation, reverse roll.
Aluminum Fascia System includes closed end brackets and fascia panel.
Mount brackets. Note: If you have an inside mount and must use "Inside mount holes", you must drill your own holes in the side of the bracket. Use at least two screws per bracket. BE SURE SCREW HEADS ARE CLEAR OF CLUTCH. Mount shade. MAKE SURE SHADE IS LEVEL. Install fascia panel by hooking top rib over brackets and snapping bottom rib into place over brackets tangs. BE SURE PANEL IS SNAPPED ON SECURELY.
Rear bead is against clutch housing when fabric is completely rolled up. Front stop bead will be located down on the chain at the proper location to limit fabric travel.
On all Phifer shades with or without fascia, stop balls are installed on control chain to limit the travel of the fabric. The stop ball to the back side of the clutch should be installed with the fabric rolled completely up on the roller as in the picture above. The other stop ball is located on the chain to stop the fabric travel just below the length of the opening. Fabricator Instructions-How to Attach the RollEase Tension Device to Control Cords
In order to be in compliance with the voluntary standard (American National Standard for Safety of Corded Window Covering Products) developed by WCMA and approved by the American National Standards Institute (ANSI), manufacturers, fabricators and workrooms are required to deliver finished window covering systems with the following:
Warning Tag attached to the RollEase control cord and plastic or metal bead chain. Tension Device attached to the control cord and plastic or metal bead chain with a Tension Device Warning Tag attached to the Tension Device.
The RollEase Tension Device complies with the ANSI standard.
Warning Tags on Control Cord and Bead Chain
All RollEase control cords are shipped with a Warning Tag attached. The Warning Tag will not interfere with installing the control cord into the clutch or with the operation of the clutch. If using metal or plastic bead chain, attach the Warning Tag to the bead chain before you close the chain.
Tension Device Attachment Instructions
There is a right and a wrong way to attach the Tension Device to the control cord or bead chain. The direction of the flat surface (back side) of the Tension Device must match the back surface of any RollEase clutch. Once the Tension Device is attached it cannot be removed.
Position the Tension Device making sure the cord is not twisted, then snap the Tension Device closed. Be sure the Tension Device is securely snapped together.
WARNING
Young children can strangle in the loop of pulled cords, chain and bead cords, and cords that run through window coverings. They can also wrap cords around their necks. To avoid strangulation and entanglement, keep cords out of reach of young children. Also,
1. Install safety devices that remove the cord loop or reduce access to cords, and
2. Move cribs and furniture away from window covering cords. Soft Shade Back side of Clutch Back of Tension Device
Roller Shade/System III Back side of Clutch Back side of Tension Device
1" Horizontal 2" Horizontal & Pleated/Cellular Back side of Clutch Back side of Tension Device
Shown right hand control, flat "back" side of Tension Device faces right.
Installer/Consumer Instructions - How to Install the RollEase Tension Device Tension Device Installation Instructions for Installers and Consumers
The Tension Device reduces the hazards of strangulation and entanglement of young children by limiting access to the control cord. Anchor the Tension Device, that is attached to the shade's control cord or bead chain, to the window frame or wall, so that young children cannot pull the cord around their necks.
Lower the shade or blind. Hold the Tension Device upright so the Warning Tag hangs straight down. Position the Tension Device on the window frame or the wall so that the Tension Device and control cord do not interfere with raising or lowering the shade. Tension Device should be installed without stretching or pulling down on the control cord. Stretching the cord will cause excessive wear. Do not twist or cross the control cord. Holding the Tension Device upright, and in position, as show, insert and secure the screw through the hold.
Note: The mounting screw must be secured into a solid surface or molly.