Comfortex Harmony Vertical Blinds Installation Guide
Options
Cellular Verticals are available
with two different top treatments - valance or wood
fascia. Tracks may be side stack or split stack.
Determine which options you have before beginning
installation by reading the packing list.
BASICS
A few simple tools are required:
- Measuring tape
- Power drill, drill bits
- Hex head and/or Phillips driver bit
- Pencil
- Level
Additional fasteners other than those sent with your blind may be required depending on the mounting surface. Wallboard and plaster require the use of anchors such as expansion or toggle bolts. Brick, tile or stone need special plugs and drill bits. Remember to always pre-drill holes in wood to avoid splitting.
HARDWARE
A. Blinds with Valance
 Outside Mount Bracket for Blinds with Valance |
 Inside Mount Bracket for Blinds with Valance |
|
1 1/4" Hex Head |
3/4" Round Head Tensioner Screw | |
B. Blinds with Wood Fascia
 Outside Mount Bracket for Blinds with Fascia |
 Inside Mount Bracket for Blinds with Fascia |
Extension Bracket (used for Side Mounting) |
1 1/4" Hex Head |
3/4" Round Head Tensioner Screw | |
BRACKET INSTALLATION
Basics
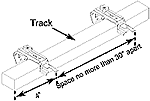
Choose the appropriate mounting option for your application. End brackets should be located with centerlines 4" in from each end. Additional brackets should be spaced no more than 30" apart.
![]() The mounting surface must
be level for the vertical to operate correctly. The
brackets may need to be shimmed for out of level
windows.
The mounting surface must
be level for the vertical to operate correctly. The
brackets may need to be shimmed for out of level
windows.
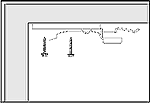
Bracket Installation
A. Blinds with
Valance
1. Inside Mount
The back of the mounting bracket must be 1/8" from
any obstruction.
Temporarily rotate mounting clip to
install second screw.
When repositioning the clip,
make sure that the rivet used to attach the clip is all
the way to the back of the slot.

2. Outside Mount
A mounting surface of at
least 1 3/4" is required for an OB or wall mount.
Assemble the mounting bracket with the wing nut and bolt provided.


Make sure that the wing nut is facing up, so that it does not interfere with the mounting clip.
Position the top surface of the mounting bracket at
the desired height. Secure bracket to the mounting
surface with two screws.
Make sure that all brackets
are aligned and level.

If mounting above a molding or other possible obstructions, loosen the wing nut and adjust the bracket to project the mounting bracket beyond the obstruction. This will ensure that the vanes do not hit or rub the obstruction. Brackets will adjust to project the blind up to 1 3/4".
 3. Side
Mount
Bolt an inside mount bracket to an
extension bracket as shown.
Bracket Installation
B. Blinds with
Fascia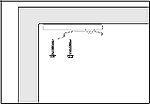 1. Inside Mount
The back of the mounting bracket must be 1/8" from
any obstruction.
Temporarily rotate mounting clip to
install second screw.
When repositioning the clip,
make sure that the rivet used to attach the clip is all
the way to the back of the slot.
 2. Outside
Mount
A mounting surface of at least 1 3/4" is
required for an OB or wall mount.
Assemble the mounting bracket with the wing nut and bolt provided.

 Make sure that the wing
nut is facing up, so that it does not interfere with the
mounting clip.
Position the top surface of the mounting bracket at the desired height. Secure bracket to the mounting surface with two screws. Make sure that all brackets are aligned and level.
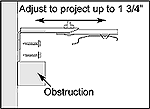
If mounting above a molding or other possible obstructions, loosen the wing nut and adjust the bracket to project the mounting bracket beyond the obstruction. This will ensure that the vanes do not hit or rub the obstruction. Brackets will adjust to project the blind up to 1 3/4".

3. Side Mount
Bolt an inside mount bracket
to an extension bracket as shown.
TRACK INSTALLATION

Insert the front groove of the track into the front of the mounting clip, then push the back of the rail up to snap into the back of the mounting clip.
CORD TENSIONER INSTALLATION
The cord tensioning device is necessary for child safety and for proper operation of the blind. The cord may droop from the track if the tensioner is not installed.
1) Choose the best mounting location for the specific
installation.
The tensioning device may be mounted to
the sill, to the jamb or to the wall.
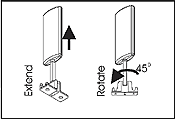
2) Fully extend tensioning device. Lock into extended position by rotating the post 45 degrees.
3) Hold the cord tensioner at the desired mounting position with the cord taut and the cord tensioning device in extended position. Screw the tensioning device to the mounting surface. If the specific installation requires that the cord tensioning device be placed in a position so that there is not tension on the cord, the cord length will need to be adjusted (see Cord Adjustment on page 7).

4) Rotate and release cord tensioning post.
CORD LENGTH ADJUSTMENT
If the cord droops from the track or if the cord is not taut when the tensioning device is installed, the cord length will need to be adjusted.
 A. Side Stack
To reduce
cord length on Side Stack:
1) Operate the track so
that the carriers are in the stacked position.
2) Locate 1/2" cord tail in front of lead
carrier.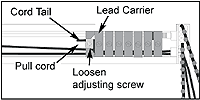
3) Loosen adjusting screw, just enough to be able to pull the cord. If loosened too much the other cord may slip out of position.
4) Pull cord tail until the cord has the proper tension.
5) Tighten adjusting screw. Make sure to tighten enough to prevent the cords from slipping.
6) Cut excess cord.
 B. Split Stack
To reduce
cord length on Split Stack:
1) Place the carriers in
the closed position.
2) Locate cord tails in front of lead carrier on the side of the track opposite the control.
 3) Loosen adjusting screw, just
enough to be able to pull the cord. If loosened too much
the other cord may slip out of position.
4) Select a 1/2" cord tail and pull slightly. If any
carrier movement is observed stop.
Select the
other cord. Caution - cutting wrong cord will
cause irreparable damage.
6) Tighten the adjusting screw. Make sure to tighten enough to prevent the cords from slipping.
7) Cut excess cord.
VANE INSTALLATION
If removal of the vanes are necessary during the installation process see the next section for the proper removal procedure.
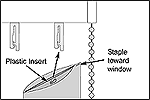
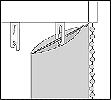
Hold the vane with the staple toward the window (back
of the blind). Pinch both halves of the plastic insert
together. Attach the vane by sliding the plastic insert
into the carrier.
Make sure that both holes in the
plastic insert are captured by the carrier hook.
REMOVAL OF VANES FROM CARRIERS - "LIFT &
PULL"
(This step is needed only if a vane needs to be repositioned during install or for cleaning, or replacement)
1) First, hold the vane between your thumb and pointer finger, pinching the plastic insert.
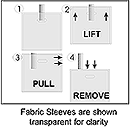
2) Slide the vane/insert straight-up (LIFT) within the carrier to release the clip (fig. 2).
3) Slide the vane away from the carrier or towards yourself (PULL) (fig. 3). Now the holes in the insert should be free from the carrier.
4) Slide the vane straight down and out of the carrier (REMOVE) (fig. 4)
 TOP TREATMENT
A.
VALANCE
Do not remove protective film until installation is complete. Install the track and vanes before attaching the valance.
1. Assembly
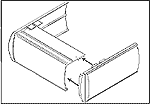
If the valance comes with
returns, snap the returns onto the ends of the valance
as shown.
2. Installation
Hold valance in front of
the Cellular Vertical and position where desired
horizontally.
The back of the flat-top of the valance
will be inserted into the front of the bracket.
Once
the valance is aligned properly insert the edge into the
bracket and press firmly until the edge of the valance
is all the way in.

B. Wood Fascia
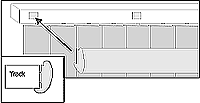
Install the track before attaching the fascia.
Hold the fascia in position. Press the Dual-Lock pieces on the back of the Fascia to the Dual-Lock on the track.
CLEANING & CARE
All parts of the Cellular Vertical can be cleaned with a feather duster or a standard vacuum. We recommend doing either of the two regularly to keep your Cellular Vertical looking new.
Spills and stains can be lightly blotted with a cloth or damp sponge. More difficult stains may require gentle washing in water with mild soap. For this, remove the vanes from the carriers, remove the inserts from the vane pocket and submerge, soak and rub lightly. Lay flat to dry or place back in window.
To iron or fully wash the vanes, remove the vanes
from the carriers.
Remove the plastic inserts from
the pocket of the fabric sleeves.
The colored fabric sleeves can be ironed if they become wrinkled. Remove the plastic vane insert from the fabric sleeve pocket before ironing the vane. Iron the vane at level 2, or the "silk" setting on a household iron.
Cellular Verticals can be ultrasonically cleaned.
REMOVAL/INSTALLATION OF VANE INSERTS
(This step is needed only for cleaning)
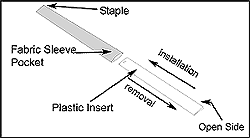
Removal
The Vane Inserts can only be
removed when the full Vane is unattached from the
carriers. Lay the full Vane on a flat surface. Gently
slide the plastic insert out from the bottom of the
fabric sleeve pocket.
Installation
Slide the slotted end of the
plastic insert (rounded corners) into the bottom of the
pocket of the fabric sleeve. The opening of the "V"
needs to face the side of the fabric sleeve with the
staple.
TROUBLE SHOOTING
Problem: When the vanes are closed, some vanes do not
overlap at the bottom of the blind.
Cause 1: Static
cling can cause the vanes to hang improperly.
Repair
1: Spray the vanes with an anti-stat spray.
Cause 2:
The vane insert is not seated fully in the
carrier.
Repair 2: Make sure that the punch holes in
the vane insert are fully engaged in the carrier.
Problem: The backs of the vanes appear
puckered.
Cause: The fabric sleeve is not seated
properly.
Repair: Gently pull down on the
fabric sleeve at the bottom, while the insert is in the
carrier.
Caution: pulling too hard may damage
the vane.
Problem: When the vanes are closed they
slant.
Cause: The headrail is not level. 1. The
inside mount mounting surface may not be level. 2. Wings
nuts are not allowing the headrail to sit properly in
the mounting clip. 3. Mounting clips slid out of
position during bracket installation.
Repair 1: Level
mounting surface with shims.
Repair 2: Insert bolt
and wing nut so that the wing nut does not interfere
with the mounting clip (wing nut should be facing
up).
Repair 3: Slide mounting clip as far forward as
it will go in the bracket. The rivet used to attach the
clip should be at the back of the slot in the clip.
Problem: Traverse cord is drooping from the track
when the vanes are stacked.
Cause: Traverse Cord is
too long or Cord Tensioner is not set
correctly.
Repair: Move cord tensioner down to create
more tension or shorten traverse cord.
See cord
adjustment section (Section VI) for instructions on
adjusting cord length.
